Integration Guide: Cheetah Digital Regular One-off Campaigns
Overview
Loyalty integrates closely with Cheetah Digital, which allows you to send email messages to your loyalty program Members using Cheetah Digital for all of the email content management, scheduling, and deployment.
Requirements
This use case requires the following assets.
Within Loyalty, you must configure:
-
Connection Profile: Connection Profiles are used to integrate Loyalty with other products, in this case, an FTP server accessible to Cheetah Digital. The Connection Profile contains the necessary information to pass data from Loyalty to the FTP server. See Connectors for more information.
-
Export Definition: An Export Definition is a repeatable asset that contains all of the information about the export file, such as the fields to include, the file type and delimiter, and optionally a schedule. See Getting Started with Exports for more information.
Within Cheetah Digital, you must configure:
-
Data Map: A Data Map is used to map each column in the Loyalty export file to a corresponding Cheetah Digital table and field.
-
FTP Profile and FTP Import Template: These assets are used to automate the import of the file from Loyalty, and to load the data into the Campaign's source table in Cheetah Digital. As part of this import process, Cheetah Digital will automatically create a Filter that selects all of the individuals contained within the import file.
-
Email Campaign: You must create and launch a Regular One-off Campaign in Cheetah Digital using the same source table where you imported the data from Loyalty. By selecting the automatically-created Filter, you can easily target the loyalty program Members in the import file to receive your Campaign.
-
Other Campaign assets: As with any Campaign in Cheetah Digital, you may need other supporting assets, such as Proofing Groups, Content Blocks, a Seed List, etc.
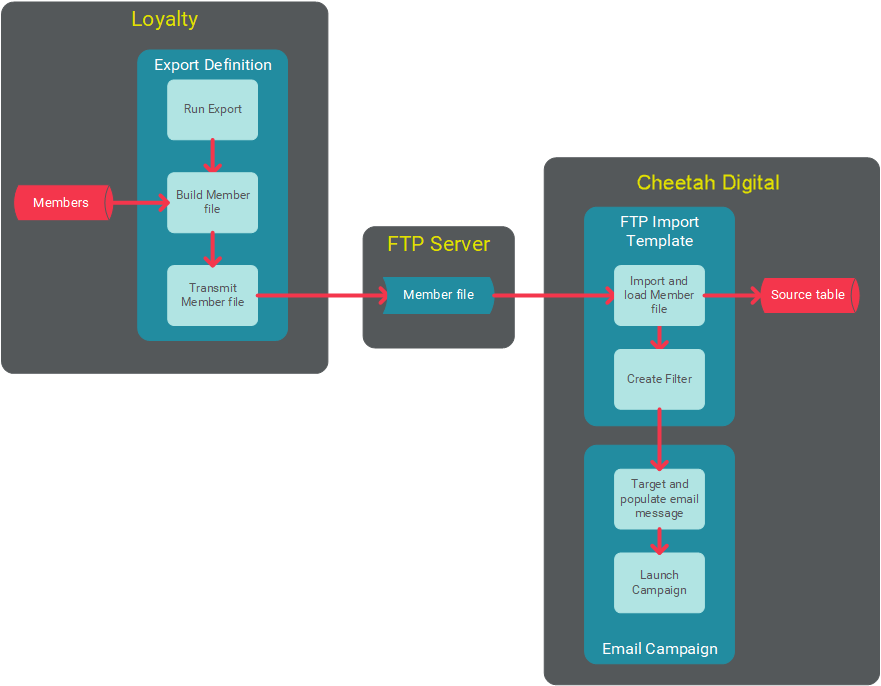
The following diagram depicts the process flow for exporting loyalty program Members to use as the audience for a Cheetah Digital Email Campaign.
Cheetah Digital: Create a Data Map
Data Maps are used when importing data into your Cheetah Digital database. The Data Map defines the sequence of the columns in the import file, and identifies the correct table and field into which each column should be loaded. Also, if the destination table is joined to other tables, the Data Map can be used to load the inbound data into the desired fields in the joined tables.
Note: This document does not describe some of the advanced Data Map features, such as mapping to joined tables, Soft Matches, and Calculated Fields. For more details on these features, please see the Cheetah Digital Help Center.
To create a Data Map:
-
From the Cheetah Digital navigation menu, select Data Integration > Data Maps.
-
Above the list of existing Data Maps, click the New Item button. The New Data Map pop-up window is displayed.
-
In the Name field, enter a name for the new Data Map.
-
From the Data Source drop-down menu, select the Source Table. This table represents the main table into which data will be loaded; a Data Map can also optionally load data into tables that are joined to this Source Table.
-
Click Create. The screen is refreshed to show a blank Data Map Details screen, where you can configure the details of the Data Map.
-
If the import file will include a header row, check File Heading.
-
From the File Delimiter drop-down menu, select the delimiter character.
-
Optionally, from the Text Qualifier drop-down menu, select a text qualifier: either Single Quote or Double Quote.
-
From the Data Processing drop-down menu, select one of the following options that controls how the system handles the import records:
-
Update or Create: Select this option if you want the import process to create new records, and update existing records.
-
Update Only: Select this option if you want the import process to only update existing records (new records are ignored).
-
Create Only: Select this option if you want the import process to only create new records (updates to existing records are ignored).
-
-
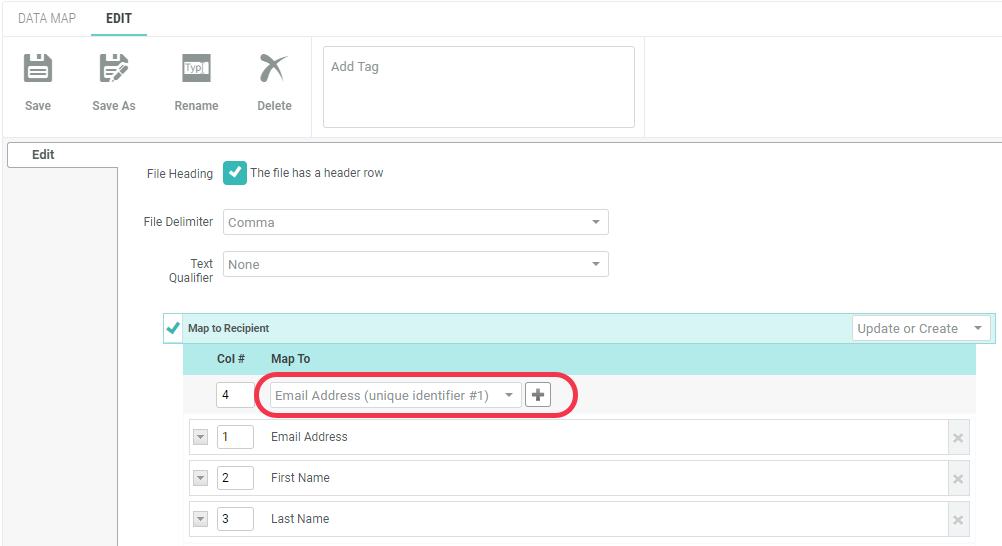
The Map To drop-down menu contains all of the fields in the Data Map's Source Table. From this menu, select the destination for the first column in the import file, then click the Add icon. Repeat this step as needed to add more fields to the Data Map. The sequence of the fields should match the sequence of columns in the export file from Loyalty. If you need to remove a field, click the Remove icon to the right of the field name.
-
In the Tool Ribbon, click Edit > Actions > Save.
Cheetah Digital: Create Import Assets
The FTP Profile and FTP Import Template in Cheetah Digital are used to automate the process of receiving the export file from Loyalty, and importing the file into Cheetah Digital.
FTP Profile
To create an FTP Profile:
-
From the Cheetah Digital navigation menu, select Data Integration > FTP / S3 Profiles.
-
Above the list of existing Profiles, click the New Item button. A blank Profiles screen is displayed.
-
Select FTP.
-
In the FTP URL field, enter the URL for the FTP Server. This URL must begin with the prefix "sftp://".
-
By default, Cheetah Digital will attempt to connect to the FTP Server in "active" mode. To instead connect in "passive" mode, check Passive Mode.
-
In the User Name field, enter the username needed to log onto the FTP Server.
-
Define an authentication method:
-
Password: Check Change Password, then enter the password. Enter the password again in the Confirm Password field.
-
SSH Key: Check SSH Keys. Click Choose File, and browse to and select your SSH private key file.
-
-
Click Save.
Note: Unlike most Cheetah Digital assets, you don't provide a name for an FTP Profile. Instead, the combination of the "FTP URL" and the "Username" values serves as the name for the FTP Profile. For example: "sftp://testserver - johnsmith"
FTP Import Template
Import processes can be defined through the use of a repeatable template. An FTP Import Template controls the schedule of when to run the import, as well as details about the file handling settings.
Note: This document does not describe some of the advanced FTP Import Template features, such as hierarchy rules, custom stored procedures, and automated notifications. For more details on these features, please see the Cheetah Digital Help Center.
To create an FTP Import Template:
-
From the Cheetah Digital navigation menu, select Data Integration > FTP Import Template.
-
Above the list of existing FTP Import Templates, click the New Item button. A New FTP Import Template pop-up window is displayed.
-
In the Name field, enter a name for the new FTP Import Template.
-
Click Create. The screen is refreshed to show a blank Import Template Details screen, where you can configure the details of the Import Template. See below for details on the different sections displayed on this screen.
Schedule
The Schedule section allows you to set a schedule for automatically executing the import process. To define the schedule frequency and duration:
-
Select when to start the import schedule:
-
Start Immediately: The schedule goes live as soon as you enable it.
-
Start On: Enter a start date and time
-
-
Define the schedule's recurrence frequency:
-
Daily: Enter an interval (every "X" days).
-
Weekly: Select one or more days of the week.
-
Monthly: Select either a specific number ("15th of the month" for example), or define a business rule to calculate a date ("second Tuesday of every month" for example).
-
Yearly: Select either a specific month / date ("January 15th" for example), or define a business rule to calculate a date ("second Wednesday in August" for example).
-
-
Select the schedule's execution time:
-
Once a day: Enter a specific start time.
-
Several times a day: Define an interval in either minutes or hours. Also, define the active window during which the schedule can run by selecting the starting and ending times for this window.
-
-
Select how long this automated schedule should run:
-
Do Not End: The schedule runs indefinitely.
-
End On: Enter the stop date and time.
-
-
To enable the schedule, click Edit > Scheduling > Start Schedule in the Tool Ribbon.
FTP Download
The FTP Download section is used to define the FTP server information, such as the expected file location and name.
-
From the FTP Profiles drop-down menu, select the FTP Profile you defined above.
-
In the File Path field, enter the filepath to the location on the FTP server where the import file will be stored. The value you enter here should include both the folder path and the filename.
Note: Cheetah Digital requires that import files have unique names (the platform won't import a file with the same name as a previous import). To keep filenames unique, the best practice is to append a date/time stamp to the filename, using the following syntax: Filename_{(yyyy MM dd hh:mm)} mm)}.csv
-
In the Post Processing Suffix field, enter a value that the platform will append to the end of every inbound file name. This suffix is used to differentiate processed files from new files, and also to prevent any confusion around duplicate filenames.
-
Optionally, if you want the platform to delete the file from the FTP site after it's been downloaded, check Delete File.
-
Optionally, if you want the platform to check the file's "last modified" date and time prior to importing the file, check Timestamp. This option is intended to prevent the platform from re-importing the same data file.
-
Optionally, if you want to use PGP encryption, check PGP Key, then enter your encryption key.
-
Optionally, if the import file is compressed and needs to be expanded, check ZIP File. If you select this option, a Password field is displayed. If you're importing password-protected ZIP files, enter the password in this field.
-
In the Tool Ribbon, click Edit > Actions > Save.
Files to Import
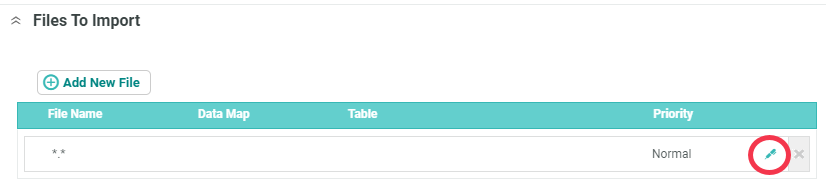
An FTP Import Template can optionally be used to import multiple files within the same ZIP file. You can choose to handle all of these files in the same manner, or you can select different configuration options and Data Maps for each file. Initially, this section displays a single item with the default file name (*.*), which indicates "all files."
To configure the import file (or files):
-
Click the Edit icon next to the default file name (*.*). The File to Import pop-up window is displayed.
-
If you want all the files within the ZIP file handled the same way, simply leave the default file name (*.*) in the File Name field. If you want to handle each file within the ZIP file separately, then enter the specific file name in the File Name field.
-
From the Import Priority drop-down menu, select the appropriate priority for this import: Urgent, High, or Normal (the default). The Priority you select determines the order in which your imports will be handled.
-
From the Data Source drop-down menu, select the Table in your database where the import file is to be loaded.
-
In the Data Map field, either begin typing in the name of the Data Map you created above, or click the Browse icon to browse for and select it.
-
Optionally, if you want to commit this file to the database without requiring manual review and approval of the parsing results, check Auto-Commit. If you leave this option unchecked, the platform will pause the import process after the parsing step, to allow you to manually review and approve the parsing results before committing the import to the database.
-
Leave Ignore Update History unchecked.
-
Check Filter / Trigger. This feature will automatically create a Filter that selects every record in this import file. You will use this Filter as the audience for your Regular One-off Campaign. The system-generated Filter will be named "Import File <Import name>" and will be located within the same Folder as the import item (selected below). The Filter will consist of a single rule that uses the File Imports Activity type to target the records in that import file .
-
Select the Folder where you want to save the import file.
-
Click Save File Mapping. The grid in the Files to Import section is updated to show the file name, Data Map, Table, and priority for this import file.
-
If you need to configure additional import files, click Add New File, then repeat the above steps as needed.
-
In the Tool Ribbon, click Edit > Actions > Save.
Loyalty: Create a Connection Profile
Connectors are used to integrate Loyalty with other Zeta Global applications, and with third-party platforms and products. Connectors contain the information needed to manage that integration, such as FTP servers, login credentials, etc. The collection of settings and properties are saved as a reusable asset called a Connection Profile.
To export Members from Loyalty, you must set up a Secure FTP Connection Profile.
-
Within Loyalty, select Admin from the top navigation bar, then select Integrations > Connectors from the side navigation menu. The Connectors screen is displayed.
-
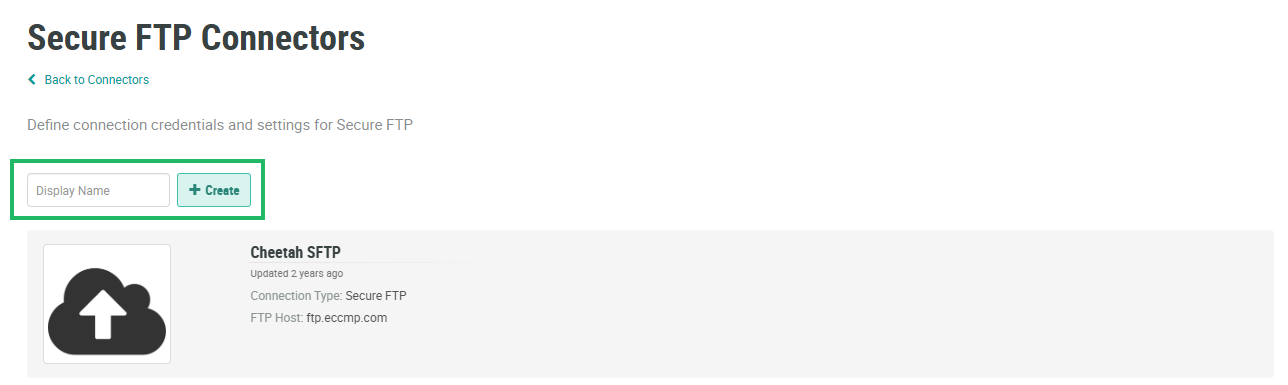
Click the Secure FTP tile. The Secure FTP Connectors screen is displayed and populated with any existing Secure FTP Connection Profiles.
-
In the Display Name field, enter a name for the new Connection Profile.
-
Click Create. The Connection Profile pop-up window is displayed.
-
The Display Name field is populated with the value you entered above; optionally edit this value.
-
The Internal Name is automatically populated based on the Display Name value. This field is not editable by default. To edit the Internal Name, check Edit Internal Name. A confirmation dialog box is displayed; click Ok. Edit the Internal Name value.
-
In the FTP Host field, enter the FTP server filepath.
-
In the FTP Port field, enter the desired server port.
-
In the Username field, enter the FTP server username.
-
From the Auth Type drop-down menu, select either
-
Password: In the Password field, enter the FTP server password.
-
Public Key: From the Private Key File drop-down menu, select an Encryption Key.
-
-
In the Root Path field, optionally enter the root path to the desired location on the FTP server. This value will be used as a prefix for all objects that use this Connection Profile.
-
Click Save.
Loyalty: Create an Export Definition
The Loyalty platform allows you to export Member records that you can then import into Cheetah Digital. The Export screen allows you define which records to export, which columns to include, where to send the export file, and how often to run the export process. All of these configuration options are stored within a reusable asset called an Export Definition.
For details on how to create the Export Definition, see Create an Export Definition. When creating the Export Definition, select the following options:
-
Connector: Secure FTP
-
Resource: Person
-
Connection Profile: Select the Secure FTP Connection Profile that you created above.
You can configure the Export Definition to execute based on a schedule, or you can execute it manually.
When the Export Definition executes, the selected Members will be written to a file, which then gets sent to the FTP Server defined in the Connection Profile. After the file lands on the FTP Server, the FTP Import Template in Cheetah Digital will instruct the Cheetah Digital platform to pick up the file, and load the Member data into the designated table / fields. Once the import completes successfully, Cheetah Digital automatically creates a Filter, which you will use as the audience for an Email Campaign (described below).
Cheetah Digital: Create an Email Campaign
The final step in this use case is to build and launch the Regular One-off Campaign within Cheetah Digital.
Note: This article does not go into the full details of creating a Campaign. For additional details on topics such as using the Content Editor, building Content Blocks and Seed Lists, or launching Proofs, please see the Cheetah Digital Help Center.
When configuring the Regular One-off Campaign, select the following options:
-
Type: Regular One-off
-
Channel: Email
-
Audience: Select the import Filter that the system automatically created when your file was imported.
After configuring the Campaign and entering the content, launch the Campaign.