Manual Imports
Cheetah Digital by Zeta supports several different methods of bringing data into the platform:
-
Upload a file through a manual one-off import process.
-
Transmit files via FTP using a repeatable automated process.
-
Manually enter records through the Messaging user interface.
-
Submit data to the platform through an API message.
-
This document focuses on how to upload a file through a manual one-off import process.
Create new Manual Import
One-off imports are managed through an asset called a Manual Import.
1. In the System Tray, select Data Integration > Processes > Imports.
2. In the Tool Ribbon, click New.
3. From the folder tree, select the folder where the import file will be saved.
4. In the Name field, enter a unique name for the file.
5. Click Save New Item.
Upload the file
The Upload File section is used to select the file that you want to import, and to define various configuration options.
1. Click Choose File, then browse to and select the desired file to upload.
2. Select an encoding method.
3. If you have any CASS / NCOA Processes defined for your account, select one from theCASS/NCOA Processing drop down menu.
4. If you have any custom stored procedures defined for your account, optionally select one from the Post-Update Process drop-down menu.
5. Check the Auto-Commit checkbox ONLY when sure the imported file will map and load correctly.
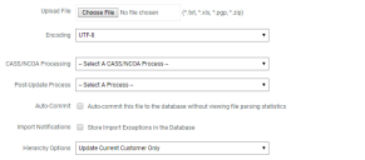
Note: If you Auto-Commit the file, you won't be able to review the parsing results prior to loading the data.
6. If the Import Notifications feature is enabled in your account, check the Import Notifications checkbox to capture and store records that encounter exceptions.
7. The Hierarchy Options drop-down menu is typically used if your account utilizes a multi division setup, such as a Parent / Child database. Select a Hierarchy Rule.
8. The Data Mapping section allows you to either select an existing Data Map, or to build a new Data Map on the fly.
9. If creating a new Data Map, click the Create a New Data Map tab, and configure the import file settings:
-
Import Into :Table to import data into
-
File Headings :Check the box if the file has a header row
-
File Delimiter :Select the character used to separate data
-
Text Qualifier :Select if using a text qualifier
-
Data Processing :Select what action will be applied to records in file
-
Make re-usable :Check to save the Data Map for future use

10. If using an existing Data Map, click the Select an Existing Data Map tab. Type in the name of the Data Map, or click the browse button to browse to and select it.

11. In the Tool Ribbon, click Save & Upload.
Map columns to the selected table
The Map Columns section is primarily used if you selected the Create a New Data Map option above. This section is used to map the columns in the import file to the correct fields in the destination table, or to any joined tables. If you selected an existing Data Map, then this section is "read only."
If the file has a header row, the platform will attempt to identify a match between each column in the import file and the fields in the destination table. The platform displays sample data from the import file to assist with the mapping process. Review and make changes as necessary.
1. Under Map To, map import columns to the fields in the destination table. To exclude a column from the import process, select DO NOT IMPORT.

2. Advanced Options can be found by clicking on the down arrow to the left of the relevant field.
Map columns to a joined table
A file may contain data that needs to be imported into more than one table. Joined tables are displayed beneath the mapping list for the main destination table.
1. Click the check mark next to Map to [table].
2. Under Map To, map import columns to the existing fields in the joined table. To exclude a column from the import process, select DO NOT IMPORT.
3. In the Tool Ribbon, click Save Data Mapping. If you're not capturing Import Exceptions, then the system begins the parsing step.
Define import exceptions
The Import Exceptions section allows you to define email notifications if the contents of your import file surpass certain thresholds for a selected import metric or exception type.
1. In the Choose Notification Type drop-downmenu, select the desired metric (or "All Metrics").
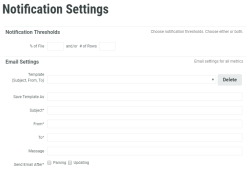
2. In the Notification Thresholds section, enter the desired threshold settings that will trigger the notification:
-
a certain percentage of the file, and / or
-
a certain number of records.
3. Either select an existing notification template, or enter the email notification settings (subject line, from email address, recipient email addresses, message body).
4. Optionally, you can save the email notification settings as a resuable template by entering a name in the Save Template As field.
5. Select when you want the system to send notifications:
-
after the parsing step, and /or
-
after the database update step.
Note: You must check at least one of these two check boxes.
6. Click OK.
7. Repeat steps 1 through 6 as needed to define email notifications for additional metrics or exception types.
Note: Each selected metric is handled separately and will generate its own email notification message.
8. In the Tool Ribbon, click Save Notifications. The system begins the parsing step.
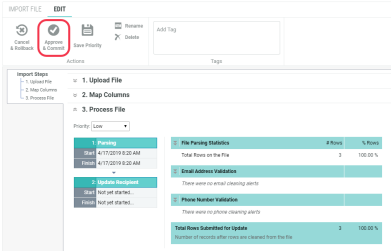
Set import priority (optional)
The default priority is Normal, but you can change it. Generally speaking, imports with a higher priority will take precedence over your imports with a lower priority.
1. Select an import priority: Urgent, High, Normal, or Low.
2. Click Save Priority in the Tool Ribbon.
Review parsing results and load the file
When you import data into Messaging, the platform runs the data through a parsing and validation step to ensure that the values are clean, valid, and usable. The results of the parsing process are displayed within the Process File section so you can review them, prior to loading the data.
Note: If you selected the Auto-commit option in Topic 2, no parsing results are displayed, and the data loads automatically.
1. Review the parsing results.
2. If you need to cancel the manual import, click Cancel & Rollback.
3. To complete the import and load the data into your database, click Approve & Commit.