
Facebook Leads to File Service
Creating the App
To have access to the lead forms data we need a page access token from the customer. This token should be a token that can never expire.
Create the Facebook app
Retrieving leads is done with a Facebook App. So, if you have not created an app yet, then you need to create an app at https://developers.facebook.com/apps/ .
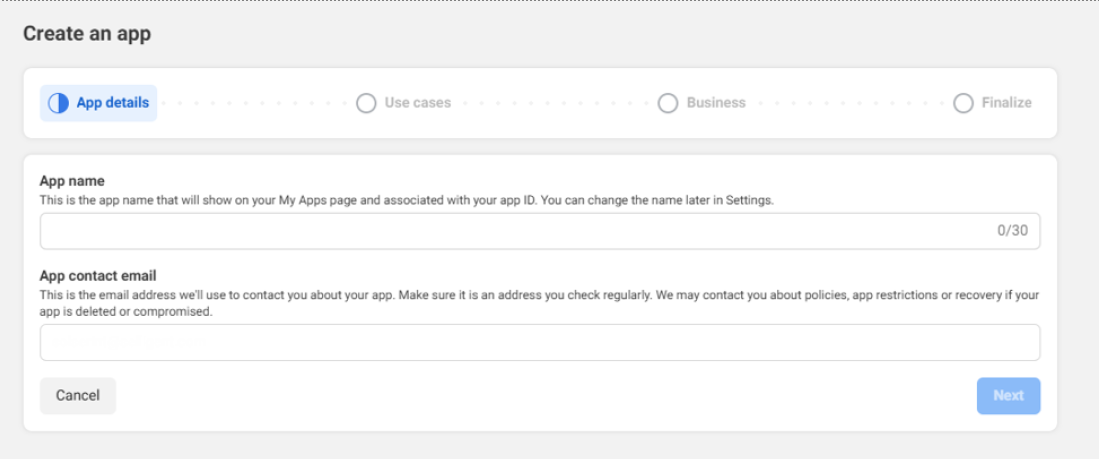
1. Click on Create App and fill out the App name and App contact email. Click Next:
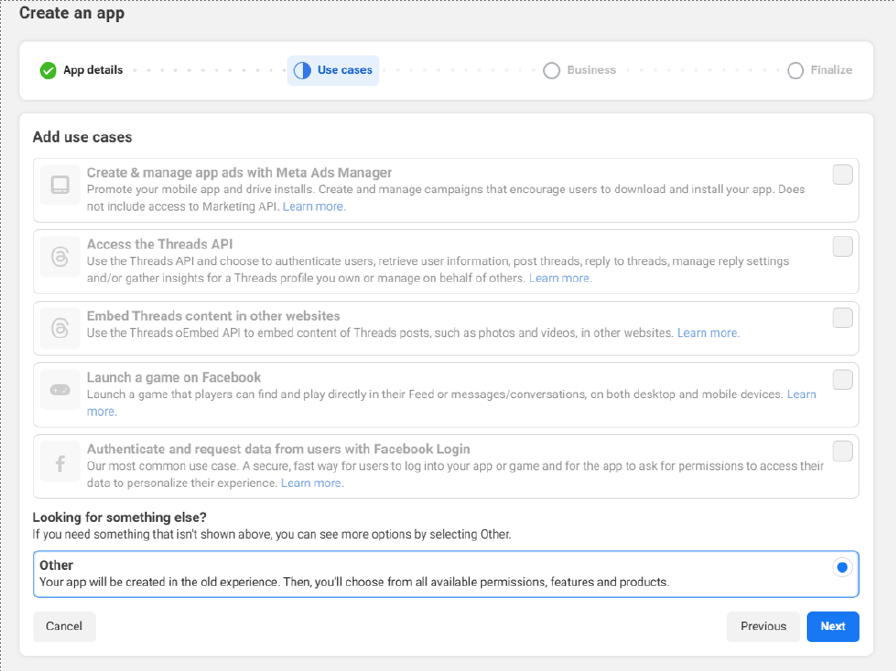
2. Select Other as use cases and click Next:
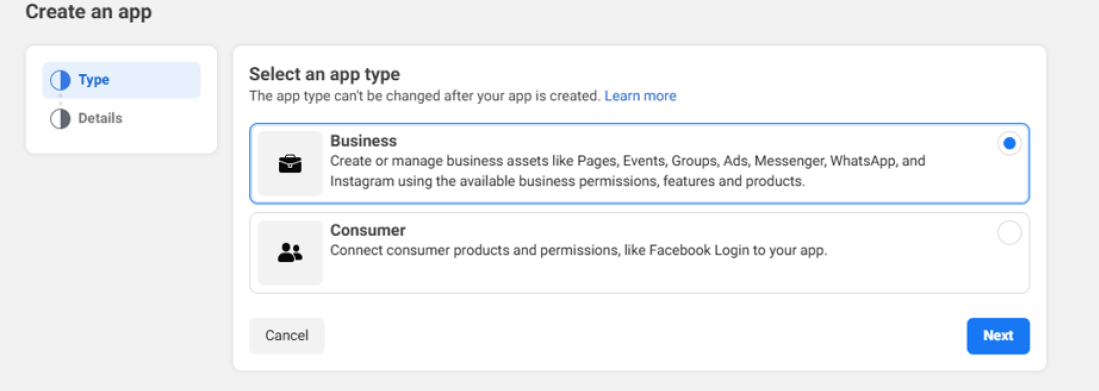
3. Select Business as App Type and click Next:
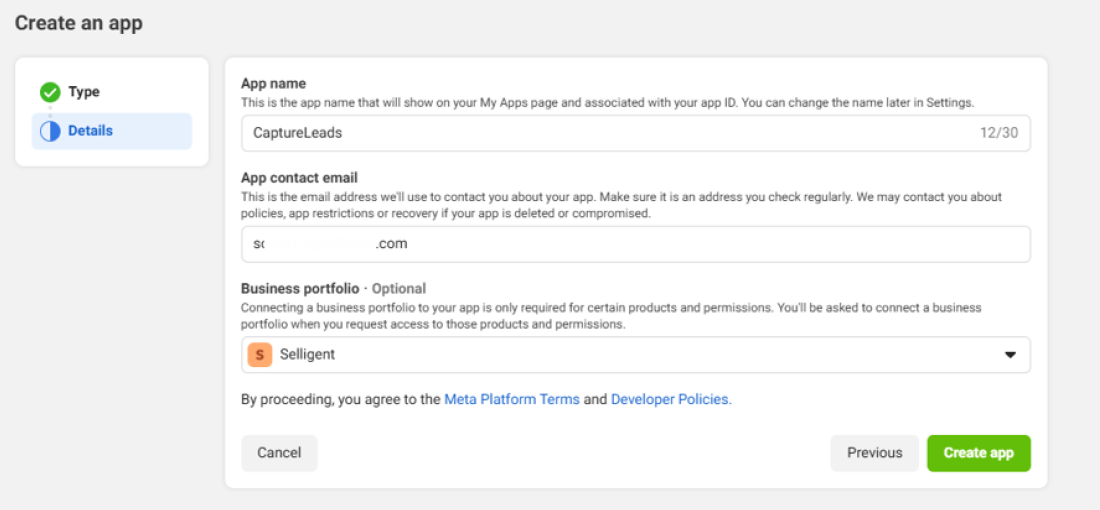
4. Validate App name and App contact Email. Select your Business portfolio and click on Create app:
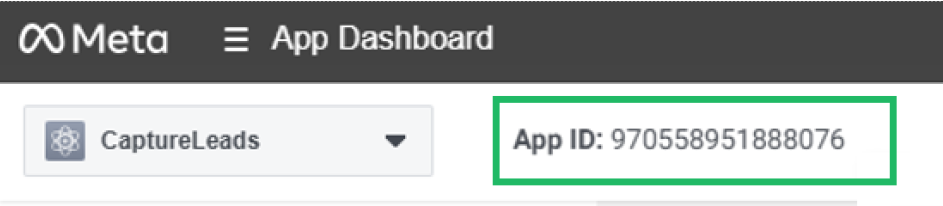
5. You can find your App ID on the top left corner:
App review
Your app needs to be in Live Mode for you to receive Leads with the GraphAPI.
-
Submit your app for review following these guidelines. https://developers.facebook.com/docs/app-review
Note: App Types determine what permissions and features can be requested for approval through the App Review process. Set the App Type to None (to allow the server-to-server app review).
-
Use the server to server App submission: https://developers.facebook.com/docs/app-review/resources/sample-submissions/server-to-server:
- a. Permissions
- i. ads_management
- ii. pages_show_list
- iii. pages_read_engagement
- iv. pages_manage_Ads
- v. leads_retrieval
- vi. business_management
- vii. instagram_basic (In case you want to use the app for Instagram leads, add this permission.)
-
b. Explanation:
We use this App to automatically import forms and the leads who fill in a Facebook form. This automatic process enables us to send out communication to new leads as soon as they register. We will only import leads who gave their opt-in consent and will target them according to the GDPR guidelines in our CRM platform. Facebook requires these permissions to read leads and form data as described in the Facebook help page : https://developers.facebook.com/docs/marketing-api/guides/lead-ads/retrieving -
c. Screen recording:
If you need to submit a screen recording of the app ask you Zeta contact, we can provide this video to you. !Note : if your leads are in different organizations you might need to apply for advanced access permissions during the app review. https://developers.facebook.com/docs/graph-api/overview/access-levels/
- a. Permissions
Leads access manager
If you have leads access manager enabled in your Facebook this affects how you retrieve leads with the graph API and you will need to set the pages settings up correctly, so the user linked to the token you created has the correct permissions to access the leads.
Note: If the leads access manager is enabled and not setup correctly you will only receive test leads from the graph API or an empty data result. The leads access manager can be found at business manager -> settings -> integrations -> lead access -> There you can select the specific page -> and assign the correct user to access leads.
More information: https://www.facebook.com/business/help/1440176552713521?id=735435806665862
Instagram is supported by the app but requires some additional setup.
As the underlying API for Instagram and Facebook is the same one, the app also supports Instagram. The API cannot access Instagram consumer accounts so you will require an Instagram Professional account. You can follow this guide for changing an Instagram account to a professional one: https://help.instagram.com/502981923235522?fbclid=IwAR0jar1PndPUGWgTUbAmz0_FReCbAJ9-JOOGjVl643vgEn50oJzj6aVulwc
Instagram Professional accounts must be connected to a Facebook Page before their data can be accessed through the API. Once connected, any Facebook User who is able to perform Tasks on that Page can grant your app an access token, which can then be used in API requests.
This guide explains how to connect a Facebook Page to your Instagram Professional account (if you don’t use your Facebook account to log into your Instagram): https://help.instagram.com/399237934150902?fbclid=IwAR2hFqK0qwP9MzogaY_MpZc05yXBi5HJnNwxgOjsmlCwDvaYdliV_2AGFOA
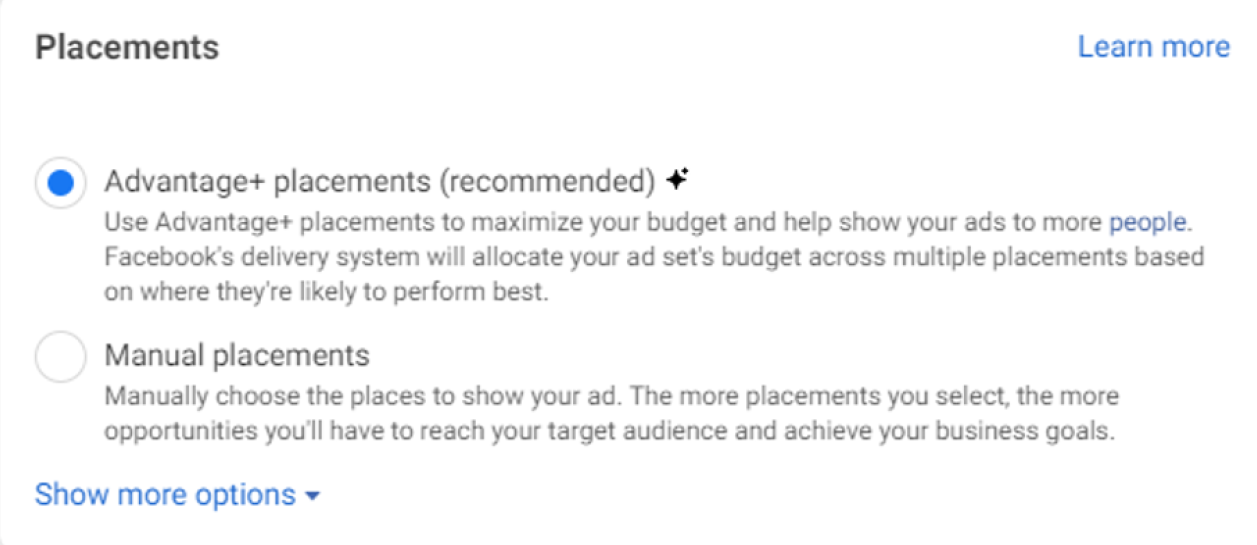
Finally verify that the placement of your Ad set is either Advantage+ (default and makes sure the Ad set is placed everywhere) or if it is a manual placement that it also includes Instagram. https://www.facebook.com/business/help/965529646866485?id=802745156580214
Data Use
Data protection assessment
Data Protection Assessment is a requirement for apps accessing advanced permissions that is designed to assess how developers use, share and protect Platform Data as described in the Facebook Platform Terms. When enrolled, an administrator of the app will need to complete a questionnaire based on their app’s access to Platform Data.
Learn more about Data Protection Assessment.
Annual data use checkup
Data Use Checkup is an annual requirement whereby you, or another app admin, must certify that your app still accesses our APIs and uses our products and data in compliance with our Platform Terms and Developer Policies.
Learn more about Data Use Checkup.
Creating Tokens
Create short lived access token
1. Go to tool explorer https://developers.facebook.com/tools/explorer/ .
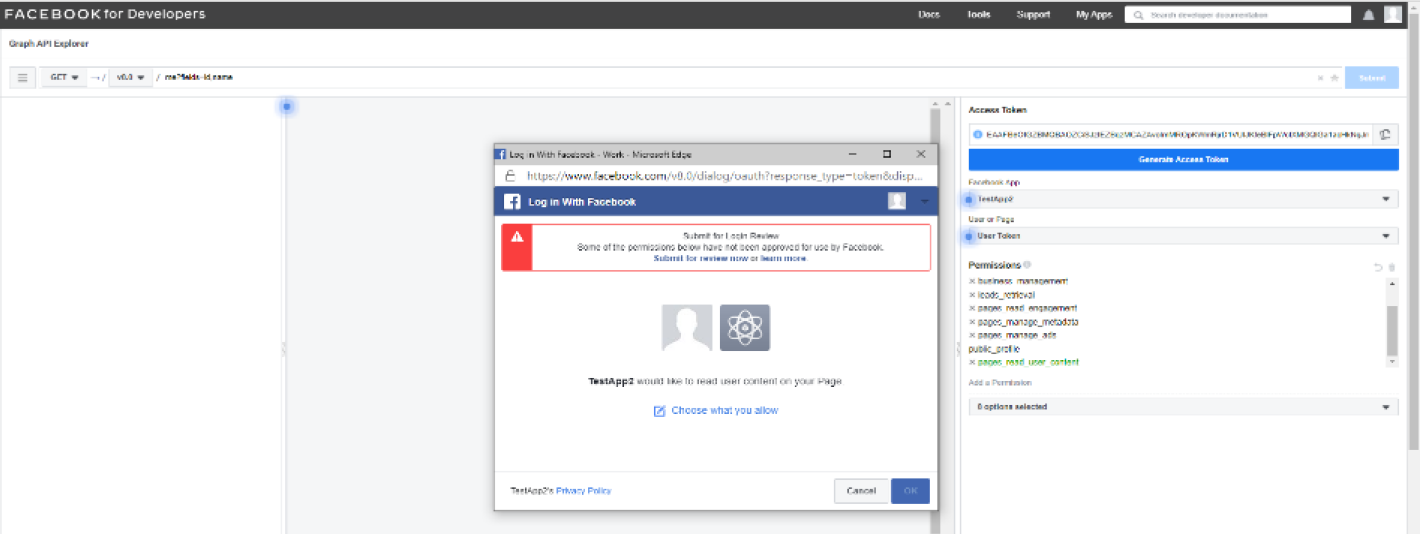
2. Select your Facebook App and the option Page Access Token. If no pages are added yet a popup window will appear asking to select the pages you want to add to the Facebook App.
3. Add the necessary permissions:
- ads_management
- pages_show_list
- pages_read_engagement
- pages_manage_Ads
- leads_retrieval
- business_management
- pages_manage_metadata
In the popup window you must submit the permissions to the App.
4. A new access token is automatically generated in the Access Token field.
Note: Do not click Generate Access Token because it will create a new blank token
Verify the settings of the access token by clicking on the i-button next to the token.
Create long lived access token
1. Go to https://developers.facebook.com/tools/debug/accesstoken/ and copy the access token in the text field and click debug.
2. If this is a short-lived user token (with the necessary permissions) then at the bottom of the debug page you will find the button Extend Access Token, pressing that will extend the expiry time of the access token with 60 days.
3. Copy that Access Token and proceed to create a never expiring page access token.
Note: Not the entire access token is shown, click debug to open a new debugger to copy the token.

Create a never expiring access token
1. Go to https://developers.facebook.com/tools/explorer/.
2. Paste the long-lived access token generated in previous step inside Access token field.
Note: Do not change any settings and do not click generate access token
3. Get the Access token.
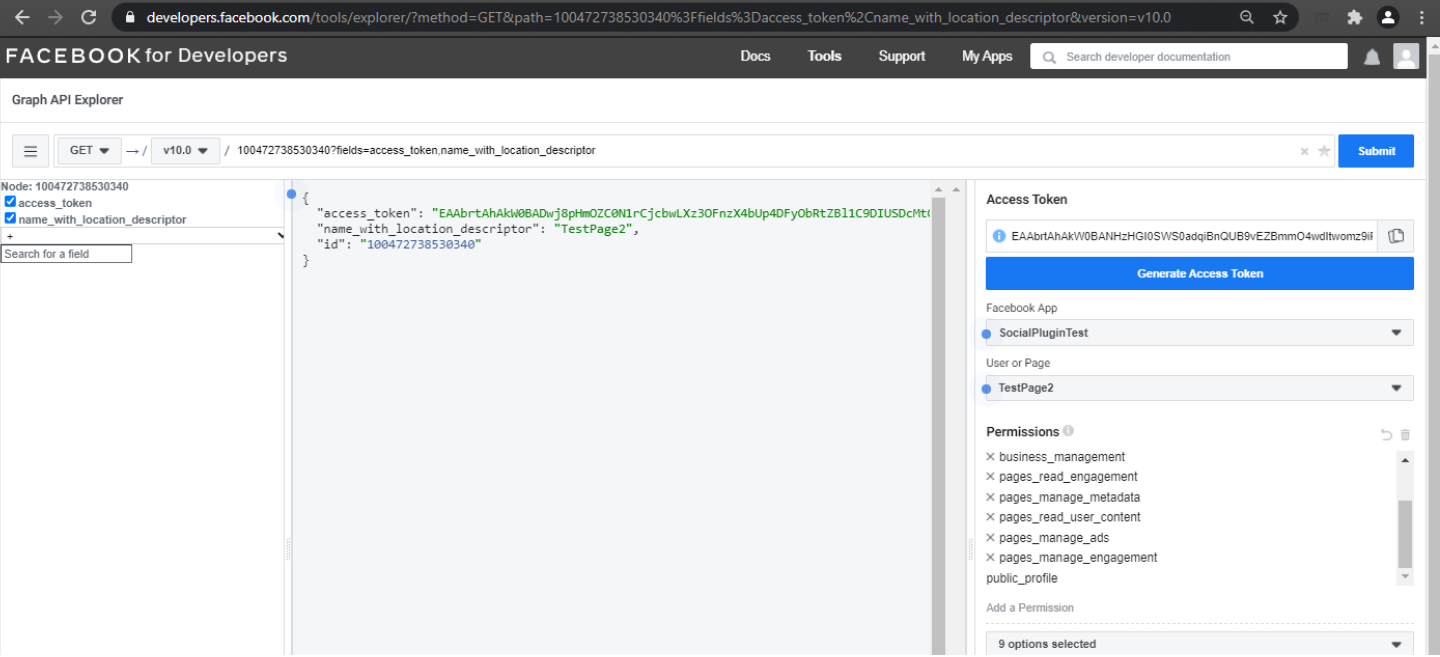
4. At the top input: fill in [YourPageID]?fields=access_token (ex: 123456789?fields= access_token) .
Copy the access token in the middle pane and verify this in the access token tool.
Find the Page ID
1. Go to facebook.com.
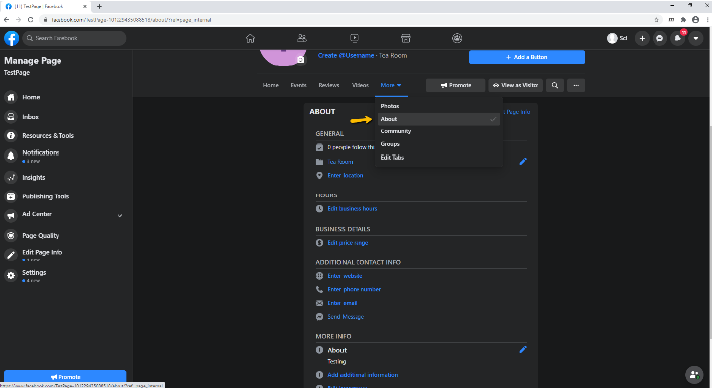
2. Go to your page and click on More > About.
3. You will find the PageId in the section more info.
Verifications
Create a test lead
1. Go to https://developers.facebook.com/tools/lead-ads-testing
2. Select the Page, Form.
3. Create a Lead.
Test retrieving a form
1. Go to https://graph.facebook.com/v8.0/{PageID}/leadgen_forms?access_token={YourAccessToken}
2. This should return a list of forms in your browser.
Test retrieving leads from a form
2. This should return a list of leads for that form in your browser.
Functionality
Form retrieval
There’s also an option to download lead form metadata from Facebook into the configuration table. This way you don’t have to copy them over manually. The only thing is that Facebook doesn’t allow to provide filters so if this is activated, it will download all forms.
By default, they will be set to Disabled = 1. So, after retrieval you will have to provide a filename and set the disabled to 0 before files are generated.
This functionality fills FORM_ID, FORM_NAME and FORM_STATUS. To activate this functionality, we need a Facebook access token that can access the list and the Facebook Page Id where the lead forms reside.
Lead exporting
The application will export leads captured by a Facebook lead generation form. It will retrieve new entries every 5 minutes and will put them as a CSV file on an internal storage space accessible via the Campaign tools. (e.g. to be processed by a data load process). For this we need at least the APP_KEY, FORM_ID (of the lead form) and an EXPORT_FILE_NAME (it uses this name to write a file on internal storage).
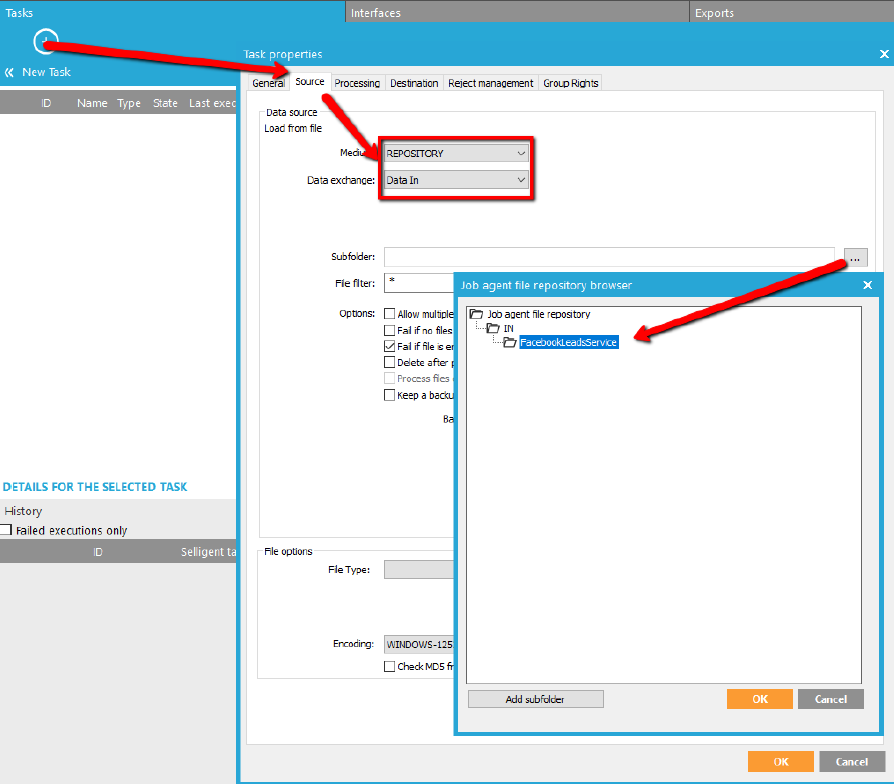
An example of where to find the folder in Campaign:
When we receive an “ARCHIVED” state from Facebook on the form, we will retrieve leads one more time and set the DISABLED = 1 right after that. From then on, the leads will not be retrieved anymore.
Data loader setup
You can use a data loader to read the CSV file into the solution. In order to set this up you will need to generate a lead and map the fields from the csv file into the correct table, fields.
The CSV file will contain the fields : id;created_time;form_id; ad_id; and the form specific fields from your Facebook form : "formfield1";"formfield2"; ...
Configuration table
| Fieldname | Data type | Definition |
|---|---|---|
| ID (S) | INT |
Autoincrement id |
|
APP_KEY* |
NVARCHAR(250) |
Facebook access token. To be generated by customer (see next chapter). |
|
FORM_ID* |
NVARCHAR(25) |
The id of the Facebook form from which to retrieve data |
|
LAST_SYNC_DT (S) |
DATETIME |
The last time the sync ran |
|
EXPORT_FILE_NAME* |
NVARCHAR(50) |
The name of the file. One replacement param available: |
|
CREATED_DT |
DATETIME |
Date the config record was created |
|
MODIFIED_DT |
DATETIME |
Date the config record was last modified |
|
DISABLED |
BOOLEAN |
When set to 1, this form won’t be processed |
|
FORM_NAME |
NVARCHAR(255) |
Name of the form (optional) |
|
FORM_STATUS |
NVARCHAR(50) |
|
| LAST_LEAD_DT (S) |
DATETIME |
Autoincrement id |
Fields with *: Mandatory to fill out.
Fields with S: System fields. Don’t change or fill.
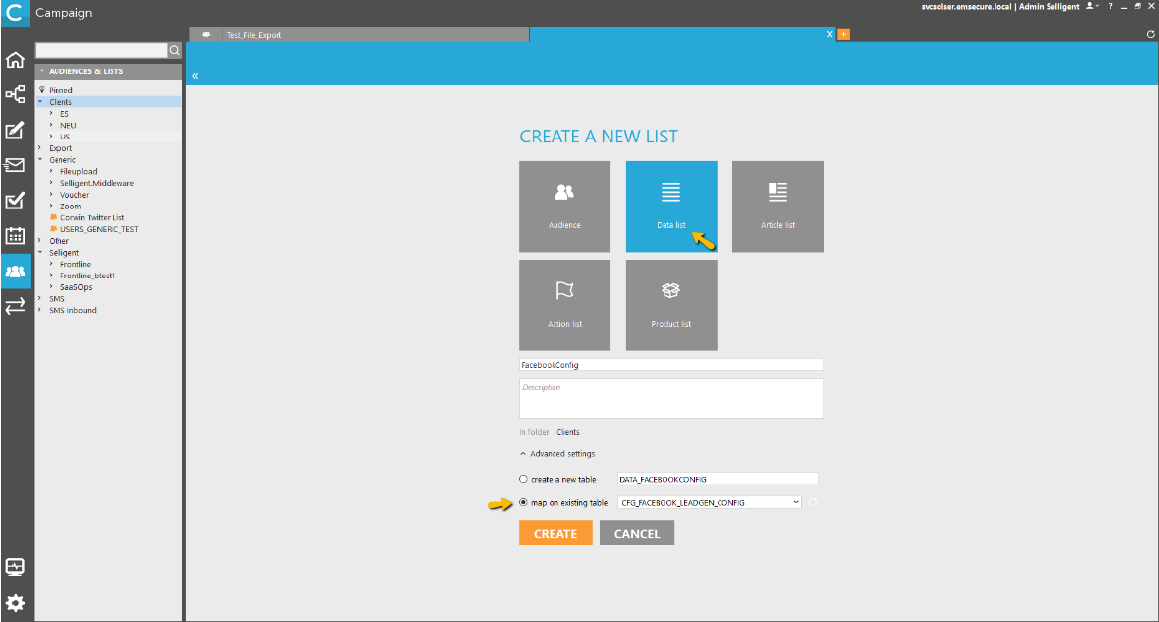
Add configuration table in Campaign
1. Go to Campaign.
2. Click on Audiences & lists.
3. Click on Create New.
4. Select Data list.
5. Enter a Name and description.
6. Click on advanced settings.
7. Select map on existing.
8. Select CFG_FACEBOOK_LEADGEN_CONFIG.
Edit configuration table in Campaign
1. Click on tap data.
2. Optionally you can fill in a value to filter on.
3. Click on Query to get the data.
4. There you can view, add, edit or delete the forms that the facebook.leadstofile.app loads.
.
