
When the Transactional message is designed and all transactional data has been configured, it can be saved, validated and published. From this moment on, the message can be used to create a Transactional Journey.
Note: The user must have explicit rights to be able to view, create or edit Transactional Journeys.
You can create a Transactional Journey directly from the message interface. A dedicated button Create Transactional journey is available in the toolbar to do so. (Only when the message has been saved, validated and published)
Note: Transactional Journeys can also be created from the Journey entry. Check out this topic for more information.
1. Click the button Create Transactional journey. The Journey properties page is displayed. The journey properties are grouped by type of information. By default only the Basic fields are displayed. Switch to the All fields tab to display all other fields. On the left hand side of the properties, on-screen help is provided. This helps the user to fill out the form with accurate and comprehensive information:
![]()
Basic Fields
General
- Folder Path — This is the folder in which the asset is created. By default it takes the folder that is currently selected on the Start page when the asset is created. You can modify the path if required. Click the folder field to access the dialog and select a different folder.
- Name — The name given to the journey. This is the name by which the journey will appear on the Start page and in reports
Asset
-
Asset — Select the transactional message that should be used for this journey. An Asset selector is available to choose the content from. Only messages marked as transactional are listed. These messages can either be email messages, mobile push messages, SMS, RCS or MMS. When the message has been selected, a preview is shown.
Seed Group
-
Seed Group — Toggle the option Send to all Seed Groups on if you want the message also to be sent to all the contacts in all the Seed Groups linked to the Audience List.
Toggle the option off if you do not want to send the message to any of the Seed Groups, or, it you only want to send it to a select number of Seed Groups. You can select the specific Seed Groups from the field below: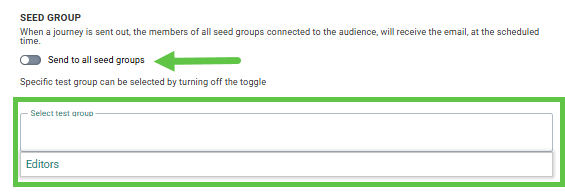
All Fields
General
- API name — This name will be used by the API to execute the journey.
- Labels — The label(s) assigned to this asset. Select one or more labels from the drop-down. (These labels are configured in the Admin configuration.) Users with the proper Access permissions can also create new labels here by typing the new label value in the field.
Analytics Tag
-
Campaign and Message analytics tags can be defined. These will be used when a tracker is activated.
Tracking
-
Toggle the option Enable journey on to activate the journey and make it available to the API.
-
Interaction tracking — Interaction covers email opens, email clicks, link tracking(emails and pages), and unsubscribe tracking. Disabling this will ensure all these interactions are not logged.
This will have an impact on:- Journey reporting
- Segmentation based on journey metrics
- Send-Time Optimization
- Unsubscribe functionality — So when contacts unsubscribe, this will still work
-
External analytics tracking — External analytics tracking covers all the external trackers like for example Google UTM, Site tracker, Shop tracker.
When this type of tracking is disabled, no parameters from external trackers will be added to domain related links and hence the information can not be used by the external tracker. This will have an impact on:- External analytics — E.g. Google analytics
- Site CRM identification — The m_bt parameter will not be added for domain links and hence C RM identification will not be done
- Shop tracker — The parameters that are added for the shop tracker will not be added and hence this will have an impact on revenue reporting
2. Press Create Journey when done.
Note: The API name of the journey must be unique.
A page is displayed with an example of the JSON script that can be used in the API call. You can copy this as is into the API and all fields are taken into account.
![]()
From this page, you have direct access to the API documentation and API Explorer. Simply follow the link. The documentation and test environment will open in a new tab.
