Configure Tier Scheme Settings
The Settings tab of the Tier Scheme Details screen allows you to configure various program settings related to this Tier Scheme.
To configure the program settings for a Tier Scheme:
-
Select Rules from the top navigation bar, then select Tier Schemes from the side navigation menu. The Tier Schemes screen is displayed.
-
Search for and select the desired Tier Scheme (see
-
Select the Settings tab. The available settings are described below in more detail.
Tier Period
If you use a Metric (or Metrics) to determine a Member's Tier assignment, the Tier Period setting controls the time period over which Metric values are evaluated for a Member's Tier progression. The Member must earn Metrics within this time period, for those Metrics to count toward their Tier advancement.
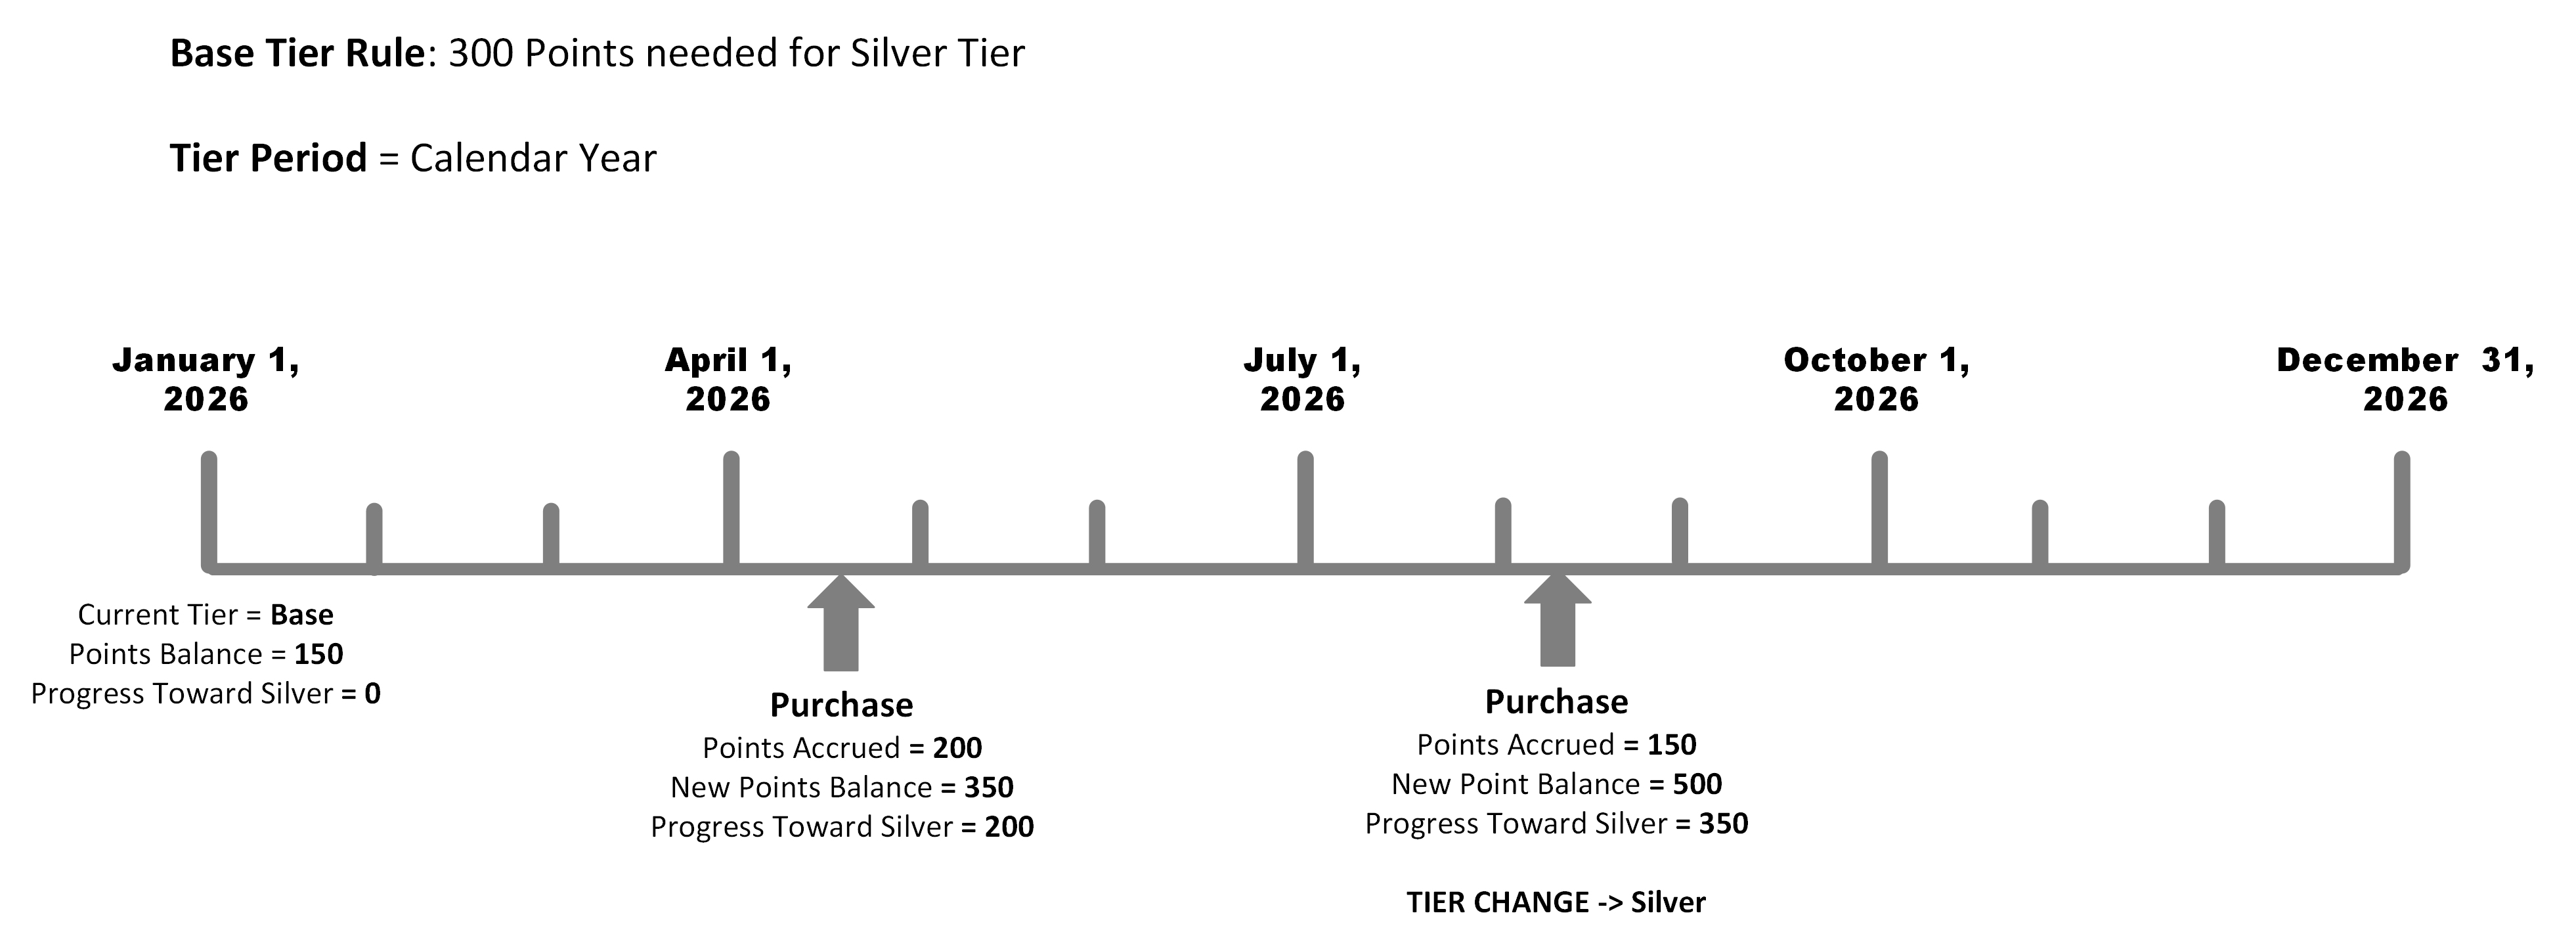
For example, let's say you have a Base Tier Rule that requires 300 Points to reach the Silver Tier, and you have a Tier Period setting of Calendar Year. This configuration means that a Member must accrue 300 Points within a calendar year to reach the Silver Tier. Points accrued last year don't count toward their Tier advancement.
Consider the following example Member. At the start of the calendar year, they are in the Base Tier, and their Points balance is 150. These 150 Points were earned prior to the current calendar year, and so they don't count toward the Member's progression toward the Silver Tier.
Later in the year, the Member makes a purchase that earns them 200 Points. Their new point balance is now 350, but they still don't qualify for the Silver Tier, because only 200 of those 350 Points were earned within the calendar year. Later, the Member makes another purchase, that earns them another 150 points. They have now earned a total of 350 Points within this calendar year, putting them over the threshold needed for the Silver Tier.
To configure the Tier Period:
-
Within the Default Period section of the Settings tab, click the Edit icon in the Action column. The Edit Tier Scheme pop-up window is displayed.
-
From the Time Period drop-down menu, select one of the following: All Time, Calendar Month, Calendar Year, Rolling 1 Month, Rolling 12 Months, or Custom.
The default option for this Tier Scheme setting is All time, meaning that a Member's progress toward the next Tier never resets.
The Custom option lets you define customized date ranges referred to as customTier Periods. For example, you could define a custom Tier Period named "2026 Q1" that runs from January 1, 2026 to March 31, 2026. See Working with Custom Tier Periods for details on how to create and manage Time Periods.
The Rolling options (Rolling 1 Month and Rolling 12 Months) let you define a date range relative to the Member's loyalty program enrollment date. For example, if you use the Rolling 12 Months option, a Member would have to accrue enough Metrics within 12 months of enrolling in order to advance to the next Tier. At the one-year anniversary of their enrollment, their progress toward the next Tier resets.
Expiration Period
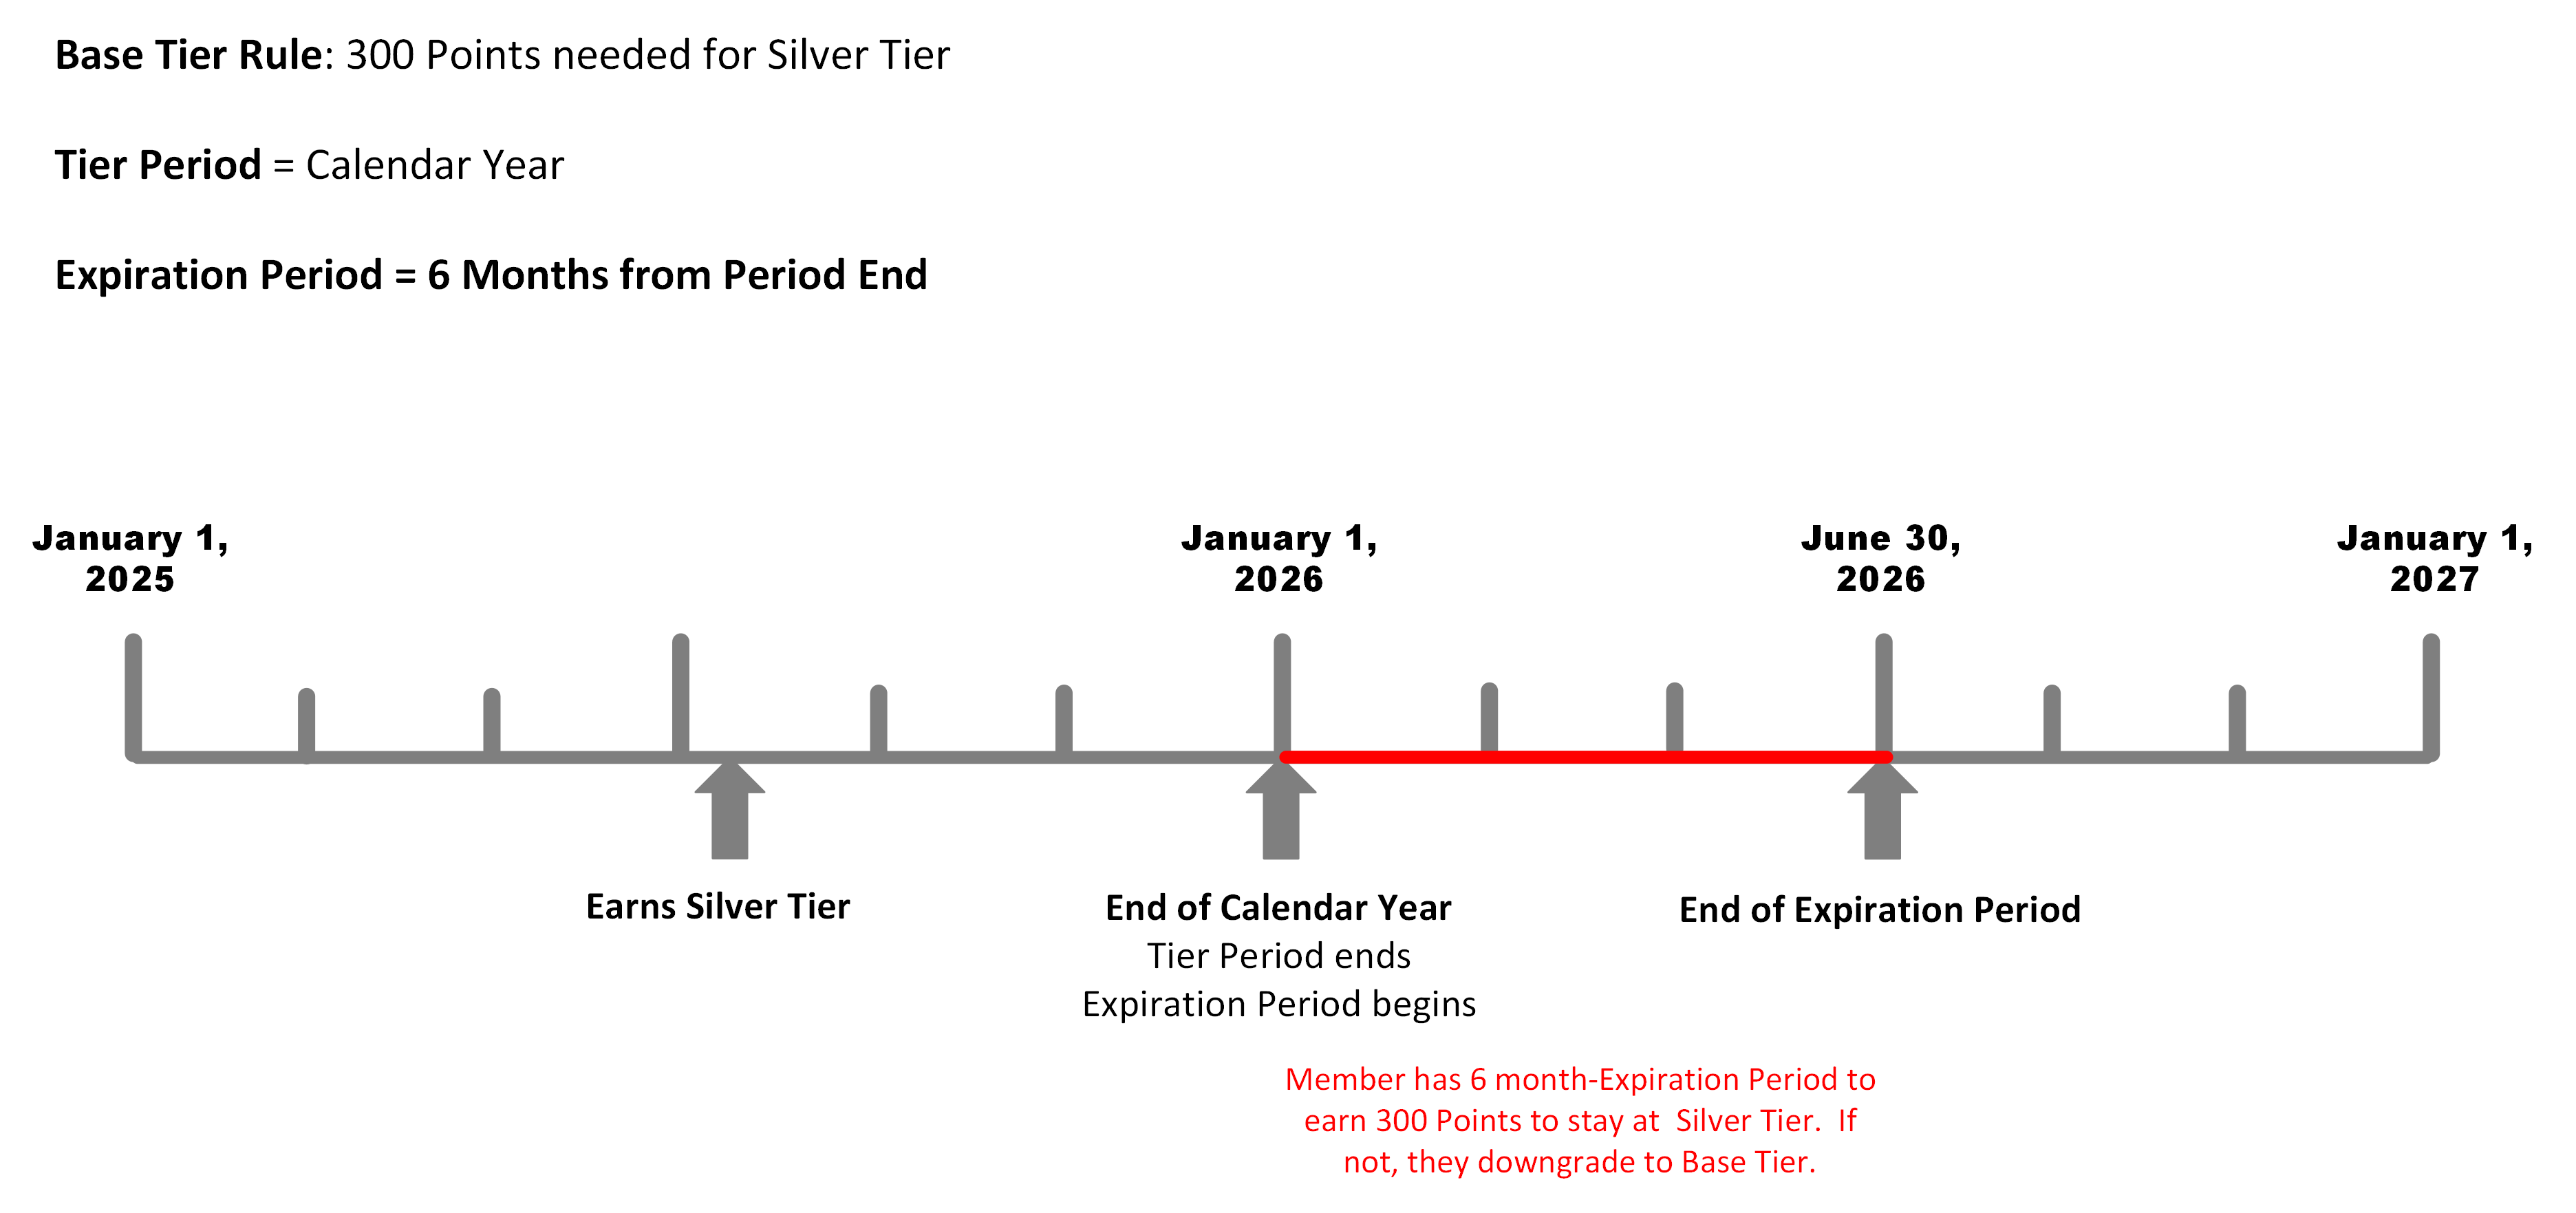
The Expiration Period setting is used to define an additional expiration period for a Member's inclusion in a Tier. Typically, this setting is used if your loyalty program allows Members to downgrade their Tier. At the end of the Expiration Period, if a Member no longer meets the requirements for their current Tier, they will be downgraded to a lower Tier.
The Expiration Period works in conjunction with the Tier Period described above. Setting the Expiration Period to 0 Years from Period End means the Member will get downgraded immediately at the end of the Tier Period (assuming they no longer meet their current Tier requirements). Setting a longer expiration period gives the Member a "grace period" during which they can earn the necessary Metrics to retain their current Tier.
Continuing the above example, let's say you have a Base Tier Rule that requires 300 Points to reach the Silver Tier, and you have a Tier Period setting of Calendar Year. This configuration means that a Member must accrue 300 Points within a calendar year to reach the Silver Tier. In addition, you set the Expiration Period to 6 Months from Period End. In this scenario, if a Member fails to meet the requirements for their current Tier at the end of the calendar year, they have an additional 6 months (that is, until June 30 of the following year) to earn enough Metrics to keep their current Tier status.
Consider the following example Member. Last year, the Member accrued the necessary 300 Points to reach the Silver Tier. If the Expiration Period had been set to 0 Years from Period End, the Member would downgrade to Base Tier immediately at the end of the calendar year. However, because the Expiration Period is set to 6 Months from Period End, the Member has an additional six months to earn 300 more Points, and retain their Silver Tier status. At the end of the Expiration Period, if the Member has not earned another 300 Points, they will be downgraded to the Base Tier.
To configure the Expiration Period:
-
Within the Default Expiration section of the Settings tab, click the Edit icon in the Action column. The Edit Tier Scheme pop-up window is displayed.
-
From the Expiration drop-down menu, select the starting point for the Expiration Period: either From Period End or From Tier Change.
Note: The above examples use From Period End as the starting point. Selecting From Tier Change instead lets you define a date range relative to the date the Member reached a new Tier.
-
Use the Expiration Value and Expiration Metric fields to define the length of the Expiration Period, such as "1 Year" or "6 Months" for example. The platform allows you to define this time range in either days, months, or years.
-
Click Save.
Upgrade Strategy
Currently, the Loyalty platforms supports only a single Upgrade Strategy: Reset Per Period. This strategy means that at the point where a Member meets the requirements for a new Tier, the platform will automatically assign the Member to that Tier. In addition, in the event that Member meets the requirements for multiple Tiers, the platform will assign that Member to the highest possible Tier for which they qualify (unless an Advanced Tier Rule prohibits this). For example, let's say a Member makes a single large purchase that earns them enough Points to jump all the way from Base Tier to Gold Tier, and completely skip the Silver Tier.
Downgrade Strategy
The ability to downgrade a Member to a lower Tier is an optional Program Setting that must be enabled in your Loyalty account. See Program Settings Category - Tier for more information.
If you have this feature enabled, then you can select the desired Tier downgrade strategy as follows:
-
Within the Downgrade Strategy section of the Settings tab, click the Edit icon in the Action column. The Edit Tier Scheme pop-up window is displayed.
-
From the Downgrade Strategy drop-down menu, select one of the following options:
-
Automatic: Evaluate the Member's Tier at the end of the Tier Period (defined above), and downgrade the Member if they no longer meet the conditions of their current Tier. Selecting this option overrides any Expiration Period defined for this Tier Scheme. For example, if you have the Expiration Period set to 6 Months from Period End, but Downgrade Strategy is set to Automatic, the platform will ignore the selected Expiration Period.
-
End of Period: Evaluate the Member's Tier at the end of the Expiration Period (defined above), and downgrade the Member if they no longer meet the conditions of their current Tier.
-
-
Click Save.