Define Event Operational Ranges
The platform allows you to control at a very granular level, when, and for how long, Members can see and respond to Events. The platform supports the following operational ranges that control these different aspects of the Event usage life cycle:
-
Event Period: This time range defines when, and for how long, the Event runs. An Event can be a one-off occurrence, or it can be configured with a recurring Event Period (for example, "every Saturday from June 1 to August 31"). For more information on setting the Event Period, see Configure Event Definition.
-
Effectivity Period: This time range applies to the Event, and controls when, and for long, the Event is visible to Members on your website or app. The default setting is Always, but you can instead define a fixed time range, or a recurring time range.
-
Response Period: This time range applies to the Event, and controls when, and for long, the Member is able to register or check in at the Event, which then creates the Event Response. The default setting is Same as Event Period, but you can optionally define a fixed time range, or a relative period (relative to the Event’s publish date).
Effectivity Period
To set the Effectivity Period for an Event:
-
Select Communities from the top navigation bar, then select Communities > Events from the side navigation menu. The Events screen is displayed. By default, List View is selected.
-
Search for and select the desired Event (see Search for an Event for more information on the available search options). The Event Details screen is displayed, with the Definition tab displayed by default.
-
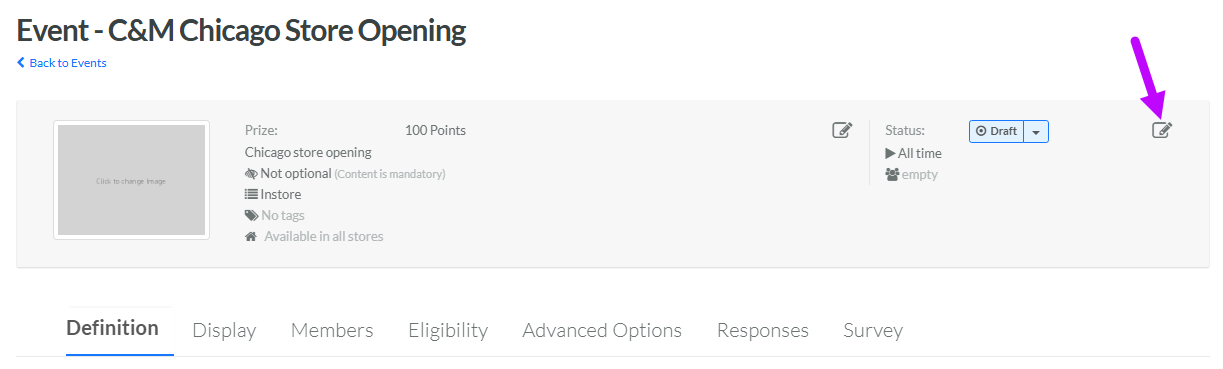
In the top-right corner of the header area, click the Edit icon. The Edit Event pop-up window is displayed.
-
Next to Effectivity, select either:
-
Always: This Event doesn't expire.
-
Scheduled: Enter a start date and end date, and select a time zone. Optionally, check Recurring to use a recurring schedule. Select the desired schedule from the Recurring Schedule drop-down menu, or define a new recurring schedule (see below for details on that process).
-
-
Click Save.
Response Period
The Response Period controls when a Member is able to register or check in at the Event, which then creates the Event Response. The Response Period can either be a fixed date range (e.g., “July 1, 2025 - July 15, 2025”) or a relative date range (e.g., “three weeks after the Event’s publish date”).
If you don't want to define a Response Period, select Same from the Select Period Type drop-down menu in the Effectivity Periods section. If this option is selected, the platform will use the Event Period (see above) as the Response Period.
Fixed Response Period
To define a fixed Response Period:
-
On the Definition tab of the Event Details screen, scroll down to the Effectivity Periods section.
-
Beneath Response Period, from the Select Period Type drop-down menu, select Fixed.
-
Click into the first date field, and select the start date and time for the Response Period.
-
Click into the second date field, and select the end date and time for the Response Period.
-
Optionally, check Recurring to use a recurring schedule. Select the desired schedule from the Recurring Schedule drop-down menu, or define a new recurring schedule (see below for details on defining a new recurring schedule).
-
Using the Time Zone drop-down menu, you can change the time zone for the Response Period to the one applicable to your business.
-
Click Save.
Relative Response Period
To define a relative Response Period:
-
On the Definition tab of the Event Details screen, scroll down to the Effectivity Periods section.
-
Beneath Response Period, from the Select Period Type drop-down menu, select Relative. The platform will calculate the Response Period relative to the date when you publish the Event.
-
Select the interval and a unit of time for the beginning of the time range. For example, 1 hour.
-
Select the interval and a unit of time for the end of the time range. For example, 2 weeks.
-
Click Save.
Recurring Schedule
To define a new recurring schedule:
-
From the Recurring Schedule drop down menu, select Enter Schedule. The Repeat pop-up window is displayed.
-
From the Count drop-down menu, select a recurrence frequency of either Weekly or Monthly.
-
In the text field, enter the interval. Enter 1 if you want the schedule to run every week, or every month.
-
For a Weekly frequency, select one or more days of the week. For example, Tuesdays and Thursdays.
-
For a Monthly frequency, choose one of the following options:
-
Day of month: Select one or more days of the month. For example, the 15th and the 30th.
-
Day of week: Select one or more days of the week, for each of the four weeks within a month. For example, the second Wednesday of the month.
-
-
Click Confirm. The system adds the new schedule to the Recurring Schedule drop-down menu.